It can be quite tricky remembering the forceps used in oral surgery and the protocol to follow when bringing a patient in for a tooth extraction…or two!
Here is a step by step guide on how to handle your oral surgery sessions:
- Before the patient arrives, check the patient’s notes:
- Name, DoB and Hospital number (write this on the whiteboard)
- Read through the medical history, and check if the patient is suffering from any illnesses, taking any drugs that will affect treatment, if they’re diabetic, or have any history of bleeding disorders
- Check there is a signed consent form, with the correct procedure written on it
- Check there is a suitable x-ray (either in the notes or on centricity)
- Complete the whiteboard with the following information on it:
- Patient Name, DoB, Hospital Number
- Tooth/teeth/roots to be extracted drawn in correct quadrant
- LA batch number and expiry date
- If patient has eaten or not
- Any relevant medication
- Any allergies
- Go and collect the right instruments and other equipment from the instrument room. For every procedure you’ll need:
- Patient cover and glasses
- Light handle covers
- Correct sized gloves for you and your assistant + hand towels each to dry hands after washing
- An apron and mask each
- LA (lidocaine/articaine) and needle + handle
- MPT
- Yankauer suction and tubing
- Correct forceps (according to which tooth/teeth)
- Couplands 1/2/3 (according to which tooth/teeth)
- Luxators 3mm/5mm (according to which tooth/teeth)
- Pack of gauze
- Post-op instructions leaflet to give to patient to take away
- Place everything on the shelf under your table, and open it up one by one and drop onto the sterile top of the table
- Call the patient in and confirm his or her Name/DoB/first line of address/whether or not they’ve eaten (they may need a glucose drink)
- Glove up and ask the patient to confirm the tooth/teeth they’ve been booked in to have extracted – ask them to point exactly to it in the mouth
- At this point your assistant should have placed barrier protection and given the patient their glasses and cover
- Once you’ve confirmed with your tutor you can administer LA, and once its worked, you can commence with “Time Out” – call a tutor over to confirm everything.
- Go ahead with your procedure. Once the tooth is removed you can check its intact (check you removed the whole tooth, by looking that the apices are intact)
- Place a gauze in the patients mouth and wait for haemostasis.
- As your assistant cleans up, give post-op instructions and leaflet to the patient and write your notes.
- Check for haemostasis and confirm with your tutor. Once confirmed, the patient is ready to go!
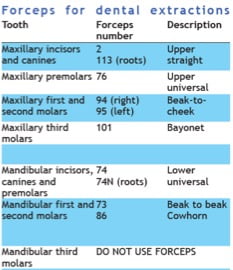
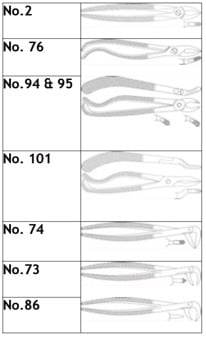
Oral surgery forceps (learn them!):