You check your timetable, and you see you’ve been scheduled onto your first OS clinic. How are they letting you loose on extracting teeth, when you’re still getting to grips with using a dental mirror?! Try not to panic! This article aims to equip you with the basic knowledge to confidently head onto Oral Surgery and extract your first tooth, without all the worry that may come with it.
Cross infection control
This is slightly different to what you will have previously experienced on the restorative clinic. Normal protocol for uniform should be adhered to (bare below the elbow etc). All the equipment we use on OS is sterile, therefore we need to maintain a sterile field whilst carrying out the extraction procedure. This is known as an aseptic technique.
Once you have cleaned down the unit as you normally would (after hand washing and wearing normal gloves), you can retrieve the required instruments from the instrument room. This may include OS kit, sterile gloves, surgical drape, suction tubing, barriers, LA, Forceps, and elevators and luxators as appropriate.
The main difference here is that we open the ‘dirty packaging’ of the instruments and drop them onto the instrument tray – so they remain sterile. Only with sterile gloves should we handle these instruments directly.
Once we are ready to commence treatment – we must put on our eye protection, mask and apron. We can then proceed to perform a hand wash following the 7 step technique. Then dry our hands with the specific hand towels provided. Using one towel for each hand and drying from fingertips to wrists. We can then put on our sterile gloves, touching the gloves once on the inside surface with our unsterile hand and using this to pull on the glove. We can then use our sterile gloved hand to apply the second glove ensuring we do not contaminate the sterile surface of the glove.
Hands should be kept at chest level, and ensure you don’t touch anything non-sterile.
This is only a brief overview so don’t be afraid to ask someone if you are unsure!
Normal process:
- Be sure to check the patient’s notes – Do they have any conditions, or are they taking any medications, that may have implications during the procedure?
Common things to look for include:
- Bleeding disorders – Inherited disease e.g. Haemophilia, von Willebrands disease
Liver disease causing impaired coagulation
Malignancy
Are they on any antiplatelet/ anticoagulant medication?
It is common to see patients on Warfarin – If so we are required to have their INR within 72 hours pre-op (ideally 24hrs). We can extract at an INR of 4 and below. Ask to see their yellow book.
Check the SDCEP guidelines on NOACs.
- Is the patient at risk of MRONJ? – due to treatment with antiresorptive or antiangiogenic drugs OR a history of radiotherapy to the head and neck area.
- It’s important to risk assess the patient and ensure you are aware if they are at increased risk of any complications.
- If you are unsure of any drugs or conditions, check what they are for in the BNF or give it a google. Better to be safe than sorry!
- Check radiographs – Be sure you have a radiograph for the tooth that is going to be taken out. What is the reason for taking the tooth out? Is there any pathology? Are there any root fractures? Is the tooth grossly carious? If it is a lower molar, how close is the tooth to the ID canal? What is the root morphology? Is it likely to turn into a surgical? All of these questions will enable you to anticipate any potential problems you may experience during the procedure.
- Write the patients details on the white board – This includes patients Name, DOB, Hospital number, Tooth to be extracted, Consent gained?, Correct site surgery complete?, Allergies, Has the patient eaten (If not supply with glucose drink/tablet), LA batch number and expiry date.
- Get the patient in
- Reconfirm medical history with the patient
- Reconfirm consent with the patient – Ask them to point to the tooth that they are having taken out.
- Correct site surgery – Ask the tutor to come round and call a time out to go through relevant patient details (to ensure it is the correct patient) and to check the correct tooth is being taken out.
- Administer Local anaesthetic.
- Carry out the procedure
- Notes and write up – Should include Date, Operator/Assistant, State procedure, LA (amount used, type, batch number and expiry date), Complications, Closure if necessary, Haemostasis achieved?, Post op instructions given, Antibiotics/ analgesics given, and should be signed and dated by both the student and tutor.
Local Anaesthetic
- Make sure you go over your regional anatomy, and understand what nerves you are numbing for extraction of each tooth. It can be helpful to look at pictures and videos to ensure you are sure on the point of insertion.
- As a rough guide – for any maxillary teeth a combination of buccal and palatal infiltration should be sufficient to achieve anaesthesia (as the maxilla is less dense than the mandible allowing the anaesthetic to diffuse).
- Posterior superior alveolar nerve block – numbs pulpal tissue, alveolar bone, and buccal gingival tissue for maxillary molars.
- Greater palatine and nasopalatine nerve blocks may also be required depending on the teeth to be extracted.
- ID block can be used to anaesthetise all lower teeth on the side of injection.
- For lower molars ID block (altering position of needle to get lingual nerve) + a long buccal (to anaesthetise the buccal gingivae) are usually used.
- Mental/Incisive nerve blocks can be used for lower premolars, canines and incisors on the side injected, however this does not provide adequate lingual anaesthesia and hence a lingual infiltration may be required.
- Cross innervation also complicates mandibular anterior anaesthesia, therefore ensure you always check the area is numb with a sharp probe, a few minutes after the injection has been administered. The patient should feel pressure, not pain.
Common instruments used
Forceps –
- Forceps are used to directly extract the tooth from the alveolar bone
- Elevators may be used beforehand.
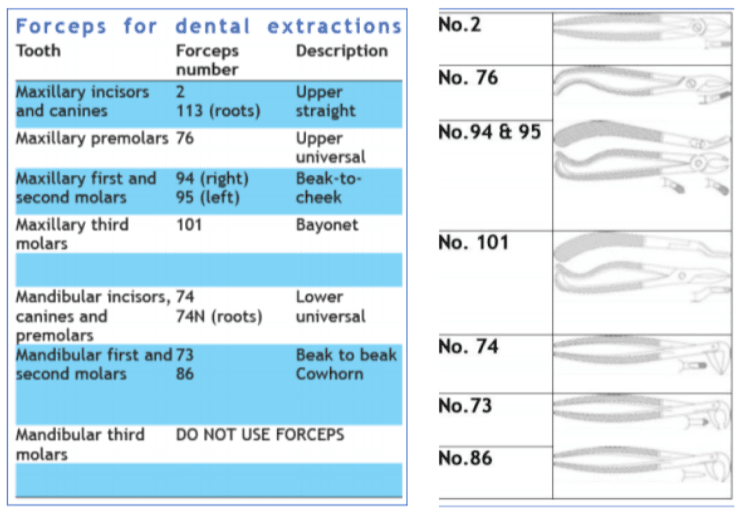
- They are site specific (as detailed in the table above)
- Preliminary movement (severs periodontal attachment). Directed against long axis of tooth, pushing blades of forceps towards the root apex. This force is maintained throughout the second movement.
- Second movement (dilates socket further and allows withdrawal of the tooth). Dependent upon tooth root and bone morphology.
- Upper incisors and canines – ROTATIONAL
- Upper premolars – BUCCAL AND PALATAL
- Upper molars – BUCCAL
- Lower incisors and canines – BUCCAL
- Lower premolars – ROTATIONAL
- Lower molars – BUCCAL
- Remember Beak to cheek
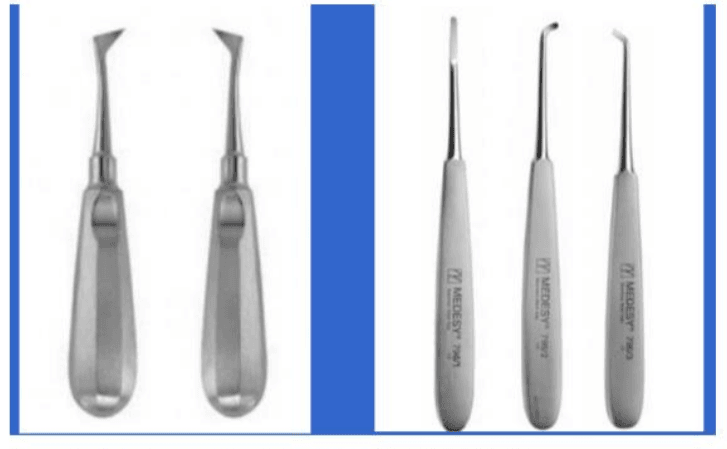
Elevators – Used with blades in between root and bone.
Couplands –
- Sizes 1,2 and 3.
- Straight blade in line with the handle
- Broader and flatter than a luxator
- Pressure to dilate the alveolar bone
- Used perpendicular to the tooth
Luxators –
- Used in long axis of tooth
- Push as far apically as possible
- 3mm and 5mm widths
- Use from side you are working on
- Finger rest on shank
- Other finger and thumb support alveolus
- Severs the periodontal ligament
Cryers and Warwick James
Remember the difference – Cryer’s are sharp so they make you cry
- Upper third molar extractions
- Removing inter-septal bone
- Retained roots
- Rotational movement
Post-operative Instructions
Once the extraction is complete the patient should be given gauze to bite down on to encourage haemostasis. One student should write the notes as previously outlined, whilst the other gives POI.
After your extraction –
- Drink cool drinks only
- Avoid hot foods and drinks (to prevent burning yourself whilst the LA is still in action)
- Avoid alcohol in any form, including mouthwash
- You should not rinse your mouth (prevent disturbance of formation of blood clot)
- Avoid excess effort and exercise
- If blood starts to ooze out of the socket – apply soft pressure to wound with handkerchief
- If bleeding persists contact DH if Monday to Friday 9-5. Out of hours contact A&E.
Pain Relief –
- Painkillers such as paracetamol (not aspirin), can be taken as normal.
Next few days –
- Salt water mouth rinses after every meal. 1 teaspoon of salt dissolved in a glass of warm water and gently bathe for several minutes.
- Continue pain relief if required
- Pain, swelling and stiffness should settle within 3-4 days. If not contact DH.
Ask the patient if they have understood and if they have any questions. This can be supplemented with an instruction booklet available on OS.
Possible complications post extraction:
- Post op pain
- Post op swelling
- Excessive bleeding
- Trismus
- Dry socket (alveolar osteitis)
- Post op infection
- Osteomyelitis
- Trauma to soft tissues
- Nerve damage
- Oral-antral communication
This is definitely not everything you need to know regarding oral surgery. But hopefully it gives you a good basis and introduction into the sort of things you need to know before extracting your first tooth.
Hoped this helped and Good Luck!
Author – Tara Kang 4th year BDS
References
Coulthard, P., Horner, K., Sloan, P. and Theaker, E. (2013). Master Dentistry. London: Elsevier Health Sciences UK.
Kushnerev, E. (2019). Basic concepts of exodontia/ Oral surgery induction lecture.
Peterson, H. (2017). Hot Tips in Oral Surgery.
SDCEP (2015). Management of Dental Patients taking Anticoagulant or Antiplatelent Drugs. [ebook] Dundee: SDCEP. Available at: http://www.sdcep.org.uk/wp-content/uploads/2015/09/SDCEP-Anticoagulants-Quick-Reference-Guide.pdf [Accessed 30 Jan. 2019].


